
Integrating IBM App Connect Enterprise v11 Toolkit with GitHub
- Yuvaraj Chandrasekaran Panneerselvam
- Mar 13, 2021
- 4 min read

In this blog, will be demonstrating how to integrate IBM App Connect Enterprise v11 (ACE) toolkit with GitHub for version controlling IBM ACE artifacts and for working with teams.
Pre-requisites:
IBM App Connect Enterprise v11 Toolkit installed
GitHub – for version control
GitHub Account & Git repository created for our purpose
Enabling token-based authentication for GitHub account
When you connect to a GitHub repository from IBM ACE v11 Toolkit, we'll need to authenticate with GitHub using HTTPS . Instead of using account password (which will not be supported from Aug 13, 2021, refer Token authentication requirements for Git operations - The GitHub Blog) we will have to use token-based authentication. Following the below steps, we can obtain the personal access token for toolkit connecting to GitHub.
Log into the your GitHub account (Github.com)
In the upper-right corner of github page, click your profile photo, then click Settings.

In the left-side navigation, click on the option Developer Settings

From the Developer Settings page, click Personal access tokens in the left-side navigation and from there click Generate new token button for generating new personal access token

Provide the note for the token as "IBM ACE toolkit" and from the list of scopes shown, select the scope repo as shown below for providing access to git operations to apps using this token

Click Generate token for the token to be created with the required scope

Click the icon provided to copy the token to your clipboard. For security reasons, after you navigate off the page, you will not be able to see the token again. Hence make note of the token for using it while configuring toolkit for connecting to git.

Integrating Toolkit with GitHub Repository
Now that we have created personal access token that can be used by toolkit to connect to our GitHub repository, we can now integrate GitHub with toolkit and associate the repository for version controlling the ACE solution artifacts.
Installing Git Plugin for Toolkit
Launch IBM App Connect Integration Toolkit on your system
Navigate to Help > Eclipse Marketplace from the Toolkit

Search for git in the Eclipse Marketplace window and from the list of plugins shown, select the plugin "EGit - Git Integration for Eclipse x.x.x" and click Install button against that plugin to have that plugin installed for our toolkit.

Select only Git Integration for Eclipse feature & unselecting all other features in the Confirm Selected features window and click Confirm

If alternate solution is provided for our selected features due to version compatibility, accept the option "Keep my installation the same and modify the items being installed to be compatible" and click Confirm.

Accept the terms of license agreements and click Finish

Once the plugin installation is completed, you will need to click yes to confirm restarting the toolkit for the changes to take effect

Cloning Git Repos in Toolkit
From the Toolkit instance launched, navigate to Window > Open Perspective > Other to see the list of available perspectives

In the list of perspectives available, you should see the Git option available. Select the Git perspective and click on OK to switch to that perspective

In the Git perspective, from the Git Repositories view, click on Clone a Git repository

To configure access to our Git repository for ACE toolkit that had been setup earlier, in the Source Git Repository window, provide our Git Repos details and click Next.
For URI, copy the GitHub repos HTTPS URL from the GitHub as shown below

For user, provide your GitHub account username / email id
For password, provide the personal access token that we had configured earlier

If the GitHub repos is new repository, in the Branch Selection window, no branches will be shown. Otherwise select the branch that you would want to use for versioning your artifacts into and click Next

Specify the local directory (file system) on your system where the remote GitHub repos will be cloned locally and click on Finish

GitHub Repos will be added to the Toolkit as shown

Toolkit Team Synchronization with GitHub Repos - Pushing Changes
To manage the ACE solutions source code and version control using our GitHub repos, go back to the Integration Development perspective in the toolkit.
Select the project / application, right click and select the option Team > Share Application

In the Team:Share projects in an application window, right click on the project / application shown and select the option Team > Share Project

Select the Repository type as Git and click Next

For the Repository, select the earlier cloned GitHub Repository from the drop-down and the with the project selected, click on Finish

To commit the changes into GitHub repos, right click on the project that we just shared in the team and select the option Team > Synchronize Application

In the Team: Synchronize projects in an application, right click on the project / application and select the option Team > Commit

Provide the commit message and select all the files that are required to be version controlled in our GitHub repos and click on Commit.

Select the configured for remote repository in the Destination Git Repository window and click Finish

To push the changes into GitHub repos, right click on the project that we just committed and select the option Team > Synchronize Application
In the Team: Synchronize projects in an application, right click on the project / application and select the option Team > Push Branch

Provide the branch name and click Next
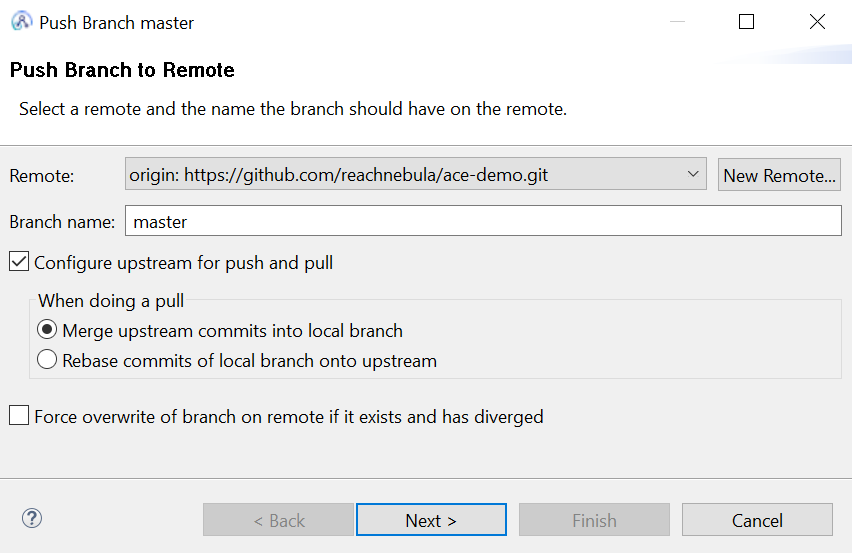
Click Finish in the Push Confirmation window

To confirm that our ACE solution artifact has been successfully committed and pushed to our remote GitHub repos, access your GitHub repos on Github.com. You should be seeing your ACE solution resources in the code section.

Follow the above steps to commit and push more solution artifacts into the GitHub repos.
Importing Projects from GitHub Repos to Toolkit workspace
For importing the projects from the GitHub repos into the toolkit workspace, from the Git perspective of toolkit, from the Git repos earlier cloned in toolkit, select the project / application under Working Directory and right click to select Import Projects

In this blog, we have seen how to use GitHub with IBM App Connect Enterprise Toolkit for version controlling and hope this being helpful.
Leave your valuable comments / suggestions in the Blog or you could mail your thoughts / comments / suggestions to reachnebula@learnibmesb.com.


Comments