API Connect V2018.4.x – Kubernetes Deployment on Google Cloud Platform (GCP)
- Yuvaraj Chandrasekaran Panneerselvam
- Nov 1, 2019
- 14 min read
With IBM API Connect v2018.x, IBM had provided deployment options for API Cloud components (Management Server, Analytics, Developer Portal and Gateway servers) as either Appliance-based (OVA) or Container-based (Kubernetes).
I have been trying to have the API Connect V2018.4.x on Google Cloud Platform, container-based deployment for the following 3 components –
Management Server
Analytics Server
Developer Portal Server
and the other Gateway server also on Google Cloud Platform, but using linux deployment option.
Have provided the process below which I had followed for the API Cloud V2018.4.x setup on Google Cloud Platform. Hope this will guide you in setting up your own environment.
Requirements:
API Connect V2018.4.x container based images and the install assist utility (apicup) for windows downloaded from IBM Fix Pack central
Docker installed on the local machine / laptop
For Windows 10 Pro / Enterprise Edition that comes with Hyper-V enabled, follow the following link to setup docker on your local machine https://docs.docker.com/docker-for-windows/install/
For Older Windows version or Windows 10 Home edition, without Hyper-V, following the following link to setup docker on local machine https://docs.docker.com/toolbox/toolbox_install_windows/
Google Cloud SDK setup on local machine / laptop ( Follow the steps are per the link https://cloud.google.com/sdk/docs/quickstarts , to setup Google Cloud SDK on your local machine, as per your OS )
Helm (kubernetes Package Manager) installed and added to Environment Variable Path of the window machine. Refer to https://helm.sh/docs/using_helm/#installing-helm. Use the “From the Binary Releases” option for installing Helm.
SMTP Server –> We will subscribe to fake SMTP service offered by MailTrap. Create a free account in mailtrap.io and access the Demo Inbox setup for SMTP server access details.VariablePurpose / ObjectiveYOUR-DNSrefers to domain name registered in your Google DomainsNAMESPACErefers to the kubernetes namespace created for API Connect components deploymentIMAGE-PATHrefers to the path on local machine where the API Connect component’s container images are placed. Its assumed the softwares / images have been already downloaded from IBM Fix Central and placed in this directoryPROJECT-IDrefers to the id of the Google Cloud project created in GCP for the purpose of API Connect deployment and in which Kubernetes cluster will be createdPROJECT-NAMErefers to the name of the Google Cloud project created in GCP for the purpose of API Connect deployment and in which Kubernetes cluster will be createdGCP-HOSTspecifies the region of the registry’s storage (in our case same as the zone / region of our kubernetes cluster deployment. The valid options are (refer https://cloud.google.com/container-registry/docs/pushing-and-pulling?hl=en_US) :
a) gcr.io hosts the images in the United States, but the location may change in the future b) us.gcr.io hosts the image in the United States, in a separate storage bucket from images hosted by gcr.io c) eu.gcr.io hosts the images in the European Union d) asia.gcr.io hosts the images in AsiaMGMT-IMAGErefers to image file name of API Connect Management Server image downloaded from IBM site, with absolute pathANALYTICS-IMAGErefers to image file name of API Connect Analytics Server image downloaded from IBM site, with absolute pathPORTAL-IMAGErefers to image file name of API Connect Portal Server image downloaded from IBM site, with absolute pathCLUSTER-IPrefers to external IP address assigned to ingress load balance after ingress deployment to the clusterMGMT-SUBSYSTEM-NAMErefers to Management subsystem name for deployment. e.g. mgmtANALYTICS-SUBSYSTEM-NAMErefers to Analytics subsystem name for deployment. e.g. analytPORTAL-SUBSYSTEM-NAMErefers to Portal subsystem name for deployment. e.g. ptl
Extract the APIC Install Assist Utiltiy
Extract the apicup install assist utility to a desired directory on the local machine
Add the directory into which apicup utility is extracted to the PATH environment variables on windows
Open a command window and type apicup version to confirm the file is being recognized

Creating & Setting up Google Cloud Platform account:
Access Google Cloud Platform link [https://cloud.google.com]
Login using existing google account to subscribe to Google Cloud Platform using that account, otherwise create new a new account

Once logged in either using existing Google account or the newly created one, click on the option “Get started for free”
Select the country and accept the Terms of Service for continuing the subscription to Google Cloud Platform.

In the next step, provide your details and the credit card information to complete subscription and get $300 credit for max 1 year usage.
Once logged in the Google Cloud Console, create a new project (lets say apic-project , and will be using the same project reference through out this blog as [PROJECT-ID]) for our API Connect deployment

Initializing Google Cloud SDK on Local Machine
Open the installed Google Cloud SDK shell from the desktop or Program Menu option on Windows

Initialize Google Cloud SDK environment from the Google Cloud SDK shell using gcloud init command and follow the instructions to complete the process.


If required, relogin to the google cloud account from google cloud command window, using “gcloud auth login” and following the steps
Set the GCP Project ID using the command
gcloud config set project [PROJECT-ID]
Creating Kubernetes Cluster on Google Cloud Platform
If not logged in already, log into the Google Cloud Account.
From the left navigation pane, navigate to (Compute section) Kubernetes Engine > Clusters

Wait till, the Kubernetes Engine API gets enabled. Once its enabled, click on “Create Cluster” option to start defining cluster in GCP

Configure the Standard Cluster template as per our requirement. ( For our deployment scenarion, we will be creating cluster with 1 node with 8 CPU and 32 GB RAM )
Cluster Name: apic-cluster
Location type: Zonal (default)
Zone: us-central-a (default)

Click on “More options” under default-pool section for following configuration

Number of Nodes: 1
Image Type: Ubuntu

Machine Type: Custom
cores: 8 vCPU
memory: 32 GB

Boot disk size: 600 GB
Management: Uncheck the options “Enable auto-upgrade” & “Enable auto-repair“
Under Security, select Access scopes as “Allow full access to all Cloud APIs” and click Save.

Expand Availability, networking, security and additional features option to configure the following options

Uncheck Enable HTTP load balancing option under Load Balancing section

Enable Stackdriver Kubernetes Engine Monitoring option under Stackdriver section
Click on Create to create a new Kubernetes cluster as per our configuration


Load API Connect Container Images to GCP Container Registry
As part of this section, we will be uploading the API Connect container images for Management Server, Analytics & Developer Portal into the Container Registry on GCP
Using GCP Navigation Menu, navigate to Container Registry > Images page

Wait till Container Registry gets enabled
Open command window on the local windows machine
Upload the API Connect Management server container image to the container registry using the apic install assist utility
apicup registry-upload management [MGMT-IMAGE] [GCP-HOST]/[PROJECT-ID]
e.g:
apicup registry-upload management D:\Installation\management-images-kubernetes_lts_v2018.4.1.6-ifix3.0.tgz gcr.io/apic-project-257306

Upload the API Connect Analytics server container image to the container registry using the apic install assist utility
apicup registry-upload management [ANALYTICS-IMAGE] [GCP-HOST]/[PROJECT-ID]
e.g:
apicup registry-upload analytics D:\Installation\analytics-images-kubernetes_lts_v2018.4.1.6-ifix3.0.tgz gcr.io/apic-project-257306

Upload the API Connect Portal server container image to the container registry using the apic install assist utility
apicup registry-upload management [PORTAL-IMAGE] [GCP-HOST]/[PROJECT-ID]
e.g:
apicup registry-upload portal D:\Installation\portal-images-kubernetes_lts_v2018.4.1.6-ifix3.0.tgz gcr.io/apic-project-257306

Configuring Kubernetes Cluster for API Connect Deployment
Open Google Cloud SDK shell, if not opened already and if reuqired, login to the Google Cloud using gcloud auth login.
From the Google Cloud Console, navigate to the earlier created Kubernete cluster and click on “connect” to get the connection details for the cluster

In the Connect to the Cluster window, copy the command-line access command and run it from the google cloud sdk shell on the local machine to have cluster configuration stored locally


Create namespace “apiconnect” for our API Connect components within Kubernetes Cluster using the below command. Am using namespace “apiconnect”, but we can specify any namespace name we would like to have.
kubectl create namespace apiconnect

To deploy tiller component into the Kubernetes cluster, we would need to create service account and cluster role binding using the following command
 kubectl create serviceaccount --namespace kube-system tiller
 kubectl create clusterrolebinding tiller-cluster-rule --clusterrole=cluster-admin --serviceaccount=kube-system:tiller

Initiliaze helm (package manager for kubernetes) and to deploy the tiller component to the kubernetes cluster
helm init --service-account=tiller

Deploy the ingress to the cluster using the following command. Download the nginx-ingress-values.yaml and save to the local machine in [IMAGE-PATH]
helm install stable/nginx-ingress --name ingress --values [IMAGE-PATH]\nginx-ingress-values.yaml --namespace apiconnect

Get the details of the deployed ingress service using the command. Re-run the command multiple times, until external IP address is assigned to the ingress load balancer. Note down the IP address shown for External-IP column. Henceforth this value will be referred as [CLUSTER-IP]
kubectl get service -l app=nginx-ingress --namespace apiconnect

In the Google Cloud Console, navigate to Compute Engine > VM Instances under Compute section.

Click on SSH next to the VM instances corresponding to our kubernetes cluster. In the SSH window execute the following commands to configure vm.max_map_count system propertly, required for Analytics service component. Close the window once executed these commands.
sudo sysctl -w vm.max_map_count=262144
sudo sysctl -p
sudo sysctl vm.max_map_count


Configuring DNS for API Connect
We will now create Cloud DNS service in our GCP and add record sets for the API Connect End points host name pointing to our [CLUSTER-IP] of ingress load balancer, that had been deployed into the kubernetes cluster.
From Google Cloud Console, navigate to Network Services > Cloud DNS under Networking section

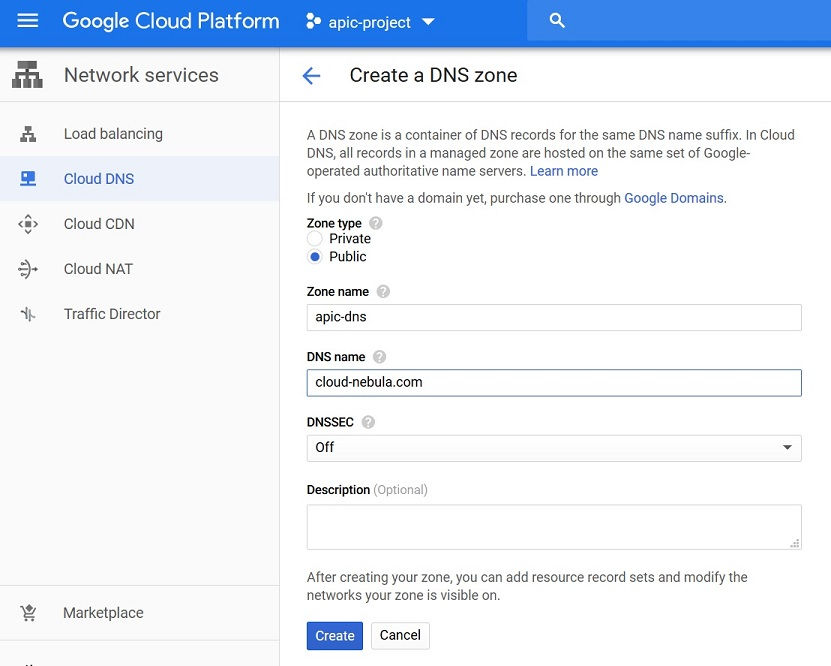
Create a zone (e.g. apic-dns) for the DNS (to be the same as your domain name created in Google Domain earlier) in the Cloud DNS and click Create. I have named my DNS name “nebula-training”, the domian that I have registered for me in Google Domain

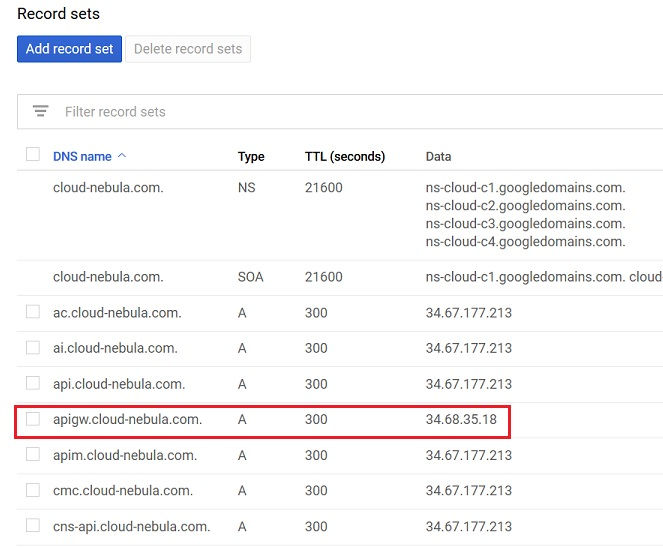
Create DNS entry for our API Connect Endpoints mapping to the [CLUSTER-IP], by adding record sets to the zone we just created in Cloud DNSAPI Connect SubsystemAPI Connect EndpointHost NameIP AddressManagementplatform-apiapi.[YOUR-DNS][CLUSTER-IP]Managementapi-manager-uiapim.[YOUR-DNS][CLUSTER-IP]Managementcloud-admin-uicmc.[YOUR-DNS][CLUSTER-IP]Managementconsumer-apicns-api.[YOUR-DNS][CLUSTER-IP]Analyticsanalytics-ingestionai.[YOUR-DNS][CLUSTER-IP]Analyticsanalytics-clientac.[YOUR-DNS][CLUSTER-IP]Portalportal-adminpa.[YOUR-DNS][CLUSTER-IP]Portalportal-wwwptl.[YOUR-DNS][CLUSTER-IP]


Copy / Note down the Nameserver details from the GCP Cloud DNS for configuring the DNS setting in the google domain
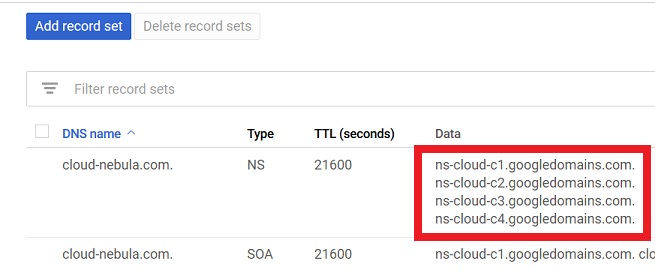
Update the DNS in Google Domain with the Nameservers of Cloud DNS. Access your domain in google domains (https://domains.google.com) from “My Domains” section.
Click Manage next to your domain name

Click on DNS in the navigation menu on left

Add the Nameserver details from the GCP Cloud DNS in the Name servers section by selecting “Use custom name server” option

Creating API Connect Deployment Configuration using Install Assist
Now that we have setup the Kubernetes cluster and have required endpoints information of API Connect components / subsystem, lets use the apicup install utility to create deployment / installation configuration
Create Installation Project directory, e.g. D:\apic2018
Open command window and change the current directory to the newly created Installation Project directory.
Initialize the Installation directory by running the command
apicup init
Create Management subsystem for K8 (kubernetes) deployment and its configuration
 apicup init
 apicup subsys create mgmt management --k8s
 apicup subsys set mgmt namespace [KUBE-NAMESPACE]
 apicup subsys set mgmt mode dev
 apicup subsys set mgmt ingress-type ingress
 apicup subsys set mgmt registry [GCP-HOST]/[PROJECT-ID]
 apicup subsys set mgmt platform-api api.[YOUR-DNS]
 apicup subsys set mgmt api-manager-ui apim.[YOUR-DNS]
 apicup subsys set mgmt cloud-admin-ui cmc.[YOUR-DNS]
 apicup subsys set mgmt consumer-api cns-api.[YOUR-DNS]
 apicup subsys set mgmt cassandra-cluster-size 1

Create Analytics subsystem for K8 (kubernetes) deployment and its configuration
 apicup subsys create analyt analytics --k8s
 apicup subsys set analyt analytics-ingestion ai.[YOUR-DNS]
 apicup subsys set analyt analytics-client ac.[YOUR-DNS]
 apicup subsys set analyt registry [GCP-HOST]/[PROJECT-ID]
 apicup subsys set analyt namespace [KUBE-NAMESPACE]
 apicup subsys set analyt coordinating-max-memory-gb 6
 apicup subsys set analyt data-max-memory-gb 6
 apicup subsys set analyt data-storage-size-gb 200
 apicup subsys set analyt master-max-memory-gb 6
 apicup subsys set analyt master-storage-size-gb 5
 apicup subsys set analyt mode dev

Create Portal subsystem for K8 (kubernetes) deployment and its configuration
 apicup subsys create ptl portal --k8s
 apicup subsys set ptl portal-admin pa.[YOUR-DNS]
 apicup subsys set ptl portal-www ptl.[YOUR-DNS]
 apicup subsys set ptl registry [GCP-HOST]/[PROJECT-ID]
 apicup subsys set ptl namespace [KUBE-NAMESPACE]
 apicup subsys set ptl mode dev

All the configurations are stored in the “apiconnect.yaml” create in our Installation direction.
Installing / Deploying API Connect Subsytems using APICUP
With the apiconnect.yaml configured as per our deployment requirement, we could now install each of these subsystems into our kubernetes cluster, again using apicup install assist.
Open the command window and navigate to Intallation project directory that we setup earlier, if not opened already.
Install API Connect Management server subsystem into our Kubernetes cluster on GCP using apicup. This command would be deploying various pods and will be taking few minutes.
apicup subsys install mgmt

Verify the installation of Management server by using helm
helm ls

Install API Connect Analytics server subsystem into our Kubernetes cluster on GCP using apicup. This command would be deploying various pods and will be taking few minutes.
apicup subsys install analyt

Install API Connect Portal server subsystem into our Kubernetes cluster on GCP using apicup. This command would be deploying various pods and will be taking few minutes.
apicup subsys install ptl

To get the details of the node and pods created & their statuses as part of this deployment for all the subsystems, execute the following commands from the local Google SDK Shell.
 kubectl get nodes -n apiconnect
 kubectl get pods -n apiconnect

Installing DataPower Gateway on Linux for API Gateway
For API Gateway, we can use any DataPower deployment. I will be setting up DataPower on Linux on GCP for the purpose of this article / blog.
Create a new VM on GCP with CentOS linux OS for the purpose of installing DataPower Gateway, by navigating to Compute Engine > VM Instances from Google Cloud Console. Click on “CREATE INSTANCE” to create a new VM.

Configure the new VM
Provide following details for the VM
 Name: [VM Name] e.g: apic-dp-vm
 Region: default
 Machine type: n1-standard-4

Change the OS for the VM to CentOS 7 and boot disk size


Specify Access Scopes and firewall rules and click on Create.

New VM is created and shown

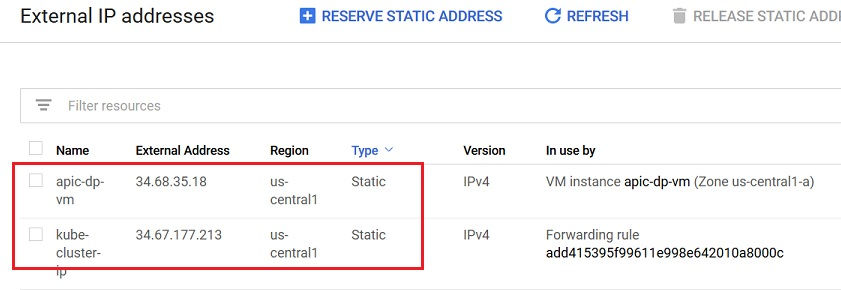
Reserve the External IP addresses for the new VM as well as the [CLUSTER-IP] of Kubernetes cluster by navigating to the VPC Network > External IP addresses in the Google Cloud Console


Click the arrow mark next to Ephemeral value corresponding to the external ip address of our newly created VM and change the value to Static to reserve the External IP address. Perform the step for the [CLUSTER-IP] of Kubernetes cluster too.

Configure Cloud DNS to add new record set for our DataPower VM Host Name (say, apigw.cloud-nebula.com) and corresponding external IP address mapping.
Upload the DataPower linux installation image to the DataPower VM on the GCP, by clicking SSH for the VM and right clicking to select Upload File option


Install the Datapower images using YUM command with root privileges


Start the Datapower service and enable web-mgmt on default port 9090 and configure admin credentials. Credentials for initial login to datapower is admin / admin.
     sudo systemctl start datapower
     sudo yum install telnet
     telnet 0 2200
Open firewall for port 9090 on Google Cloud Platform to able to access DP web user interface externally. Also open ports 3000 – 3010 for enabling communicatin between DP and API Connect Management Server and port 587 for communication with SMTP server
Navigate to VPC Network > Firewall rules from Google Cloud Console

Click on Create Firewall Rule to create a new ingress rule

Configure the Firewall rule with appropirate name and following properties and click Create.
 Targets: All instances in the network
 Source IP ranges: 0.0.0.0/0
 Protocols & Ports: 9090,3000-3010,587

Configuring DataPower for API Gateway Mode
Login to Datapower from browser using url https://apigw.%5BYOUR-DNS%5D:9090 and using the admin credentials you configured during installing DataPower. [For SSL Certificate Warning, accept and continue]. When logging in for first time, you will have to accept the software license for IBM DataPower. Post that, relogin to the DataPower using admin credentials and in default domain

Create a new domain apic-dev for API Connect by navigating to Administration > Configuration > Application Domain and click on Add

Specify domain name as apic-dev and click Apply

Click Save Configuration on top bar and once saved, switch to newly created domain apic-dev

Configuring SSL Server and SSL Client Profile in apic-dev domain of DataPower
In the navigation window, search for Crypto and click on Crypto Tools from the search result.
Specify the properties in Crypto Tools window and click on Generate Key. In the pop-up when asked to confirm, click on Confirm and then close.

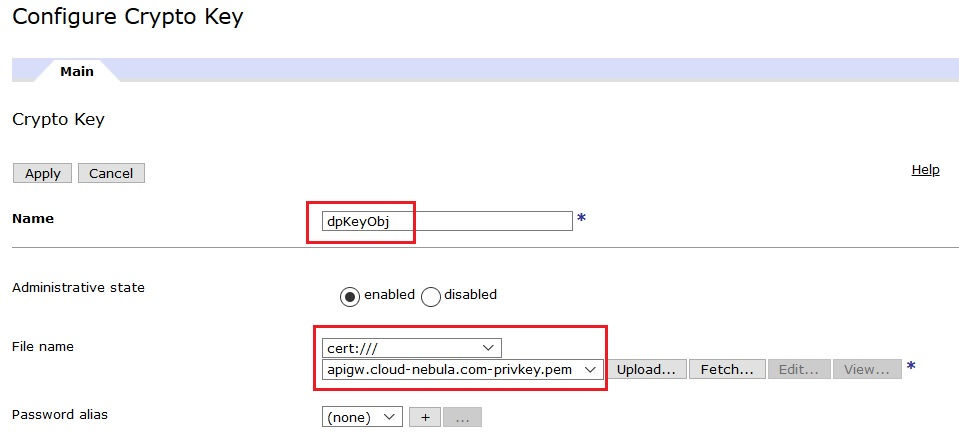
Create new Crypto Key Object (search for Crypto Key in navigation menu) referring to the Private Key file generated earlier.
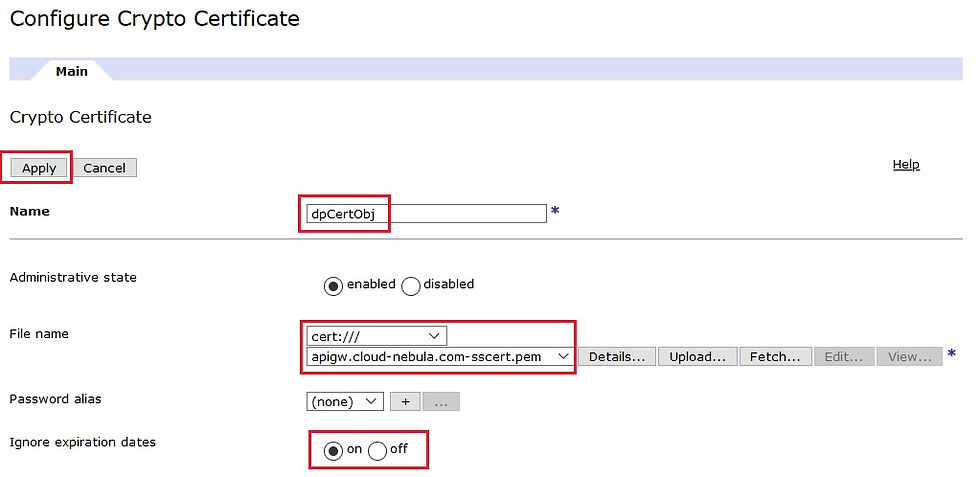
Create new Crypto Certification object (search for Crypto Object in navigation menu) referring to the self-signed certificate file generated earlier.
Create new Crypto Identification Credential object (search for Crypto Identification in navigation menu) referring to the Crypto Key & Crypto Certificate object generated earlier.

Create new Crypto Validation object (search for Crypto Validation in navigation menu) referring to the Crypto Certificate object generated earlier.

Create new SSL Server object (search for SSL Server in navigation menu) referring to the Crypto Identification Object generated earlier.

Create new SSL Client object (search for SSL Client in navigation menu) referring to the Crypto Identification Object generated earlier.

Create new Gateway Peering object (search for Peering in navigation menu).

Create new Access Profile object (search for Access Profile in navigation menu).

Create new Configuration Sequence Object (search for Configuration Sequence in navigation menu) referring to the Access Profile Object generated earlier.
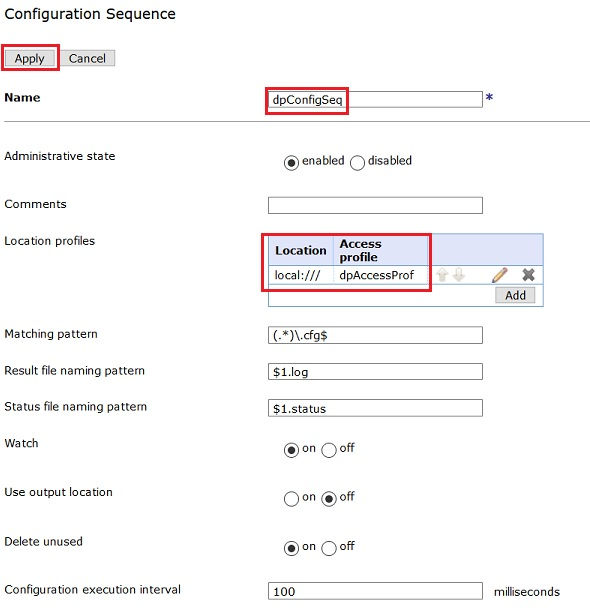
Configure existing API Connect Gateway Service Object (search for API Connect in navigation menu) referring to the SSL Server, SSL Client & Gateway Peering Object generated earlier.

Click Save configuration to persist the changes permenantly.
Configuring API Cloud using Cloud Management Console
With all pre-requisite taken care of, its time to setup API Cloud and topology using the Cloud Management Interface
Access our API Connect Cloud Management Console from browser using the url https://cmc.%5BYOUR-DNS%5D/admin. Initial credential for login is admin / 7iron-hide.

Change the Password from default to the one of your own preference, along with email id (any value in valid email format, as we are using fake smtp server) for cloud administrator.

Cloud Management Home Page is displayed, for further configurations

From the CMC Home Page, navigate to Settings > Notifications page to configure Sender Email address. Configure Sender Name and Email as per your requirement and click Save.


To configure SMTP server that is to be used for sending emails from API Connect Platform, from the left navigation menu, navigate to Resources > Notifications and click Create to add new SMTP Server configuration

Provide the details as per the SMTP connection details of your inbox configured in your mailtrap.io account. Cick on Test email button to test your SMTP server configuration and once sucessfully tested, click Save to complete adding the Email Server.

Associate the newly added Email Server configuration to our API Cloud, by navigating to Settings > Notifications and clicking Edit in Sender & Email Server. Select the newly added Email Server and click on Save.

To confiure API Cloud topology for adding the Gateway Server, Portal and Analytics server, from the left navigation menu, navigate to Topology section.
By default, a Default Availability Zone will be created. Availability Zone represents physical or logical data centers hosting our API Connect Subsystem servers. Only the Management component should span across Availability Zones, and all the other components shoud be confined to a particular Availability Zone only.

To register a new Gateway service to our API Cloud, click on Register Service in Default Availability Zone. From the type of service shown, select the Service Type as DataPower API Gateway (in this article, we will be running DataPower Gateway in API mode).

Provide the following details of the API Gateway Service and click Save
Name: Any name for your service (e.g. dev-api-gtwy)
Management Endpoint: https://apigw.%5BYOUR-DNS%5D:3000 (provide your DataPower Gateway hostname and for Port specify the value configured in Local Port property of API Gateway Service object in DataPower)
TLS Client Profile: Select Default TLS client profile

API Endpoint Base: https://apigw.%5BYOUR-DNS%5D (provide your DataPower Gateway hostname, and for Port specify the value configured in API Gateway Port propertye of API Gateway Service object in DataPower)

API Gateway Service registration confirmation message would be displayed

To register a new Analytics service to our API Cloud, click on Register Service in Default Availability Zone. From the type of service shown, select the Service Type as Analytics.

Provide the following details of the Analytics Service and click Save
Name: Any name for your service (e.g. dev-analytics-service)
Management Endpoint: https://ac.%5BYOUR-DNS%5D (Corresponds to endpoint hostname configured for analytics-client while using apicup)
TLS Client Profile: Select Analytics Client TLS client profile

Analytics Service registration confirmation message would be displayed

To associate the Analytics Service created with the API Gateway service, in the Topology screen, click Associate Analytics Service corresponding to the API Gateway service we had created earlier.

In the Associate Analytics Service window, select the newly added Analytics service and click Associate.

To register a new Portal service to our API Cloud, click on Register Service in Default Availability Zone. From the type of service shown, select the Service Type as Portal.

Provide the following details of the Portal Service and click Save
Name: Any name for your service (e.g. dev-analytics-service)
Management Endpoint: https://pa.%5BYOUR-DNS%5D (Corresponds to endpoint hostname configured for portal-admin while using apicup)
TLS Client Profile: Select Portal Director TLS client profile

Portal Website URL: https://ptl.%5BYOUR-DNS%5D (Corresponds to endpoint hostname configured for portal-www while using apicup)

With this step we have created our API Cloud Topology with all API Connect subsystems / components

Next step is to create a Provider Organization (P.Org). There should be atleast 1 P.Org to be able to offer APIs for consumption. For the purpose of creating P.Org, navigate to Provider Organizations from the left-side navigation menu option. And click on Add to create a new P.Org. From the option shown, select Create Organization.

Provide the details for creating P.Org and click Create
- Title: Name for your P.Org
- Type of user: New User

- Username: P.Org Owner user name to be used for logging in
- Email: P.Org Owner Email Id
- First Name: P.Org Owner first name
- Last Name: P.Org Owner last name
- Password: suitable password

P.Org would be created and confirmation message displayed too.

Accessing API Management UI for Provider Organization
With API Cloud configuration & P.Org creation completed, now we could log into the API Management UI from P.Org perspective for API Management and Catalog Management.
Access our API Connect Management UI from browser using the url https://apim.%5BYOUR-DNS%5D (api-manager-ui value specified using apicup). Initial credential for login is admin / 7iron-hide.

From the home page of the API Management UI, click on Manage Catalog to configure catalog for P.Org

Sandbox catalog is created by default for the P.Org.

To configure the Sandbox catalog, click on the Sandbox catalog. Navigate to the Settings > Gateway Services, to associate a Gateway Service to this catalog and click Edit

Select the API Gateway service that was registered in Cloud Management Console and click Save.

API Gateway service is successsfully associated to the Sandbox catalog.

Now to create a Portal site for Sandbox catalog, navigate to Settings > Portal of the catalog and click on Create.

Select the Portal Service that was created in Cloud Management Console from the drop-down and click Create.

This completes setting up of API Connect environment for our practice. We could now create API either using API Management UI or API Connect Toolkit and publish to Sandbox catalog for management and testing.


Comments